


How to deploy Microsoft .NET code based WebJob using Azure Devops pipelines
How to deploy Microsoft .NET code based WebJobs using Azure DevOps pipelines
WebJobs is a feature of Azure App Service that enables you to run a program or script in the same instance as a web app, API app, or mobile app. Since this runs as part of the same instance as the Web App, there is no additional cost to use WebJobs.
In simple words, It is the same as Old task scheduler method which most of the folks might have used across the globe on their physical VM’s.
There are few limitations too currently WebJobs are yet ready for Linux based WebApps.
Currently, WebJobs are hosted as 2 different types
Continuous
triggered based
How to create Web jobs using Microsoft .Net core 3.1 based Using AzureDevOps Build and Release pipeline.
Build Pipeline
It’s a 6 step process.
Go to your respective project → click on Pipelines → Click on New Pipeline.
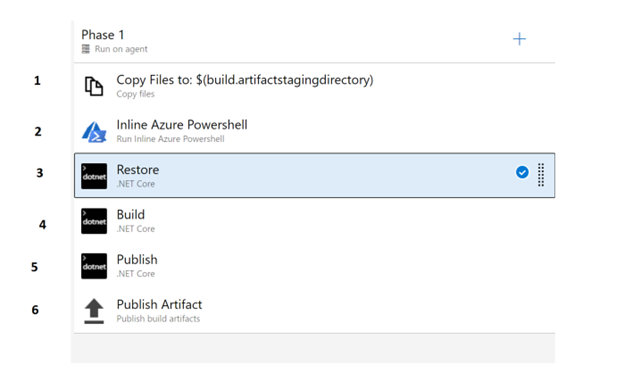
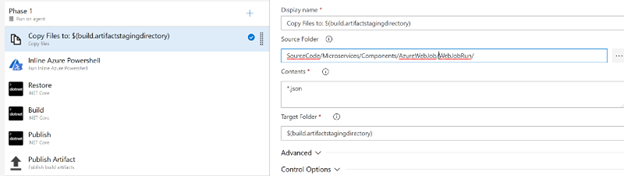
1. As a part of the build pipeline I am adding Copy files as 1st task.
Copy files task will copy files from Source code to ArtifactStagingDirectory.
2. In the second step I will be using Azure PowerShell script to replace any variables for transformation. for example here I will be replacing my default value(s) with other environment value’s where code needs to be deployed.
$EnvironmentTSfile1= “$(Build.ArtifactStagingDirectory)/appsettings.json”
(Get-Content ($EnvironmentTSfile1)) | ForEach-Object {$_.replace(‘Lowerenvironment1.database.windows.net’, ‘Higherenvironment.database.windows.net’)} | Set-Content -Encoding UTF8 ($EnvironmentTSfile1)
Here I am replacing the default value “Lowerenvironment1” with “Higherenvironment”.
3. In Step 3 I will be adding Microsoft .Net core task → I have to provide my .Net solution path.
4. In Step 4 I will be adding Microsoft .Net core task to do Microsoft .Net Build.
5. Step 5 I have to publish the actual .Net Solution output, Meanwhile, in this step make sure to pass arguments.
— configuration $(BuildConfiguration) — output $(build.artifactstagingdirectory) — self-contained -r win-x86
Here x32, x64, x86 & -10 is a processor architecture of the installed Windows OS version. The x64 agent version is intended for 64-bit Windows, whereas the x86 version is intended for 32-bit Windows.
6. Finally Publish the artefact.
Release Pipeline
Create a new Release pipeline
- Select Azure PowerShell task.
- In PowerShell script → select Inline script → Paste below script.
$resourceGroupName = “myresourcegroup”
$webappName = “mywebappservice”
$webjobName = “testjob” #the name of the webjob
$path = “$(System.DefaultWorkingDirectory)/_WebJob/publish/a.zip” #path to the .zip containing the webjob
$scheduleName = “continuous” # this shows is it a Continuos mode or Triggered based.
if (-not (Test-Path $path))
{
throw [System.IO.FileNotFoundException] “$($path) not found.”
}
# Retrieve WebDeploy credentials for uploading a file using Kudu
$publishingProfilesXml = [xml](Get-AzWebAppPublishingProfile -OutputFile test.xml -Format WebDeploy -Name $webappName -ResourceGroupName $resourceGroupName )
$publishingProfileWebDeploy = $publishingProfilesXml.FirstChild.ChildNodes[0]
$username = $publishingProfileWebDeploy.userName
$password = $publishingProfileWebDeploy.userPWD
$base64AuthInfo = [Convert]::ToBase64String([Text.Encoding]::ASCII.GetBytes((“{0}:{1}” -f $username,$password)))
$apiBaseUrl = “https://$($webappName).scm.azurewebsites.net/api"
# Upload the deployment zip to Kudu
$files = Get-ChildItem -Path $path -Recurse
Test-Path -Path $files[0]
$authHeader = “ Basic “ + $base64AuthInfo
$deployUrl = “$($apiBaseUrl)/$($scheduleName)jobs/$($webjobName)”
Write-Host “Uploading “ $path “ to “ $deployUrl
$ZipHeaders = @{
Authorization = $authHeader
“Content-Disposition” = “attachment; filename=$($files[0].Name)”
}
$response = Invoke-WebRequest -Uri $deployUrl -Headers $ZipHeaders -InFile $files[0] -ContentType “application/zip” -Method Put
Write-Host $response
Final Validation.
How do I really validate if my Web job is really working?
On Azure Portal, → Open WebApp/API Service → Go to Settings → Click on the WebJobs.

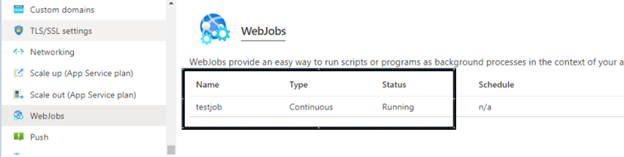
It should show the Status either as Running/stopped.
The next task is to check Logs to make sure it is really running.
Click on the job → It will show additional menu items
Click on Logs → it will open a new console window.

Click on your “testjob” → it will show extended logs.

The next validation is to check the backend Appsettings.json file to make sure it has valid parameters. How do I check?
Open Kudu console → click on Debug console → Select PowerShell

Always remember web jobs configuration and its referenced code will be stored under wwwroot folder, the logical path is
wwwroot → App_Data → jobs →continuous → testjob

Now if you open Appsettings.json → you can check all your required values/parameters.
Finally validating Log files for any Webjobs, Open path
Data → jobs → continuous →testjob

When you Open testjob folder → click on job_log.txt. You can see entire logs.
